The sensors were installed in the low flow panel and exposed to high purity water with 0.05 S/cm conductivity.  Skematik secara tertulis nya sebagai berikut : Arduino 5V > Salah Satu Kaki Sensor NTC Thermistor.
  Working Humidity Range: 35% ~ 90% RH (no frost) Dimension: 58*35*26 mm/2.28*1.37*1.02 inches. There are 3 wires: Black, Red, and Yellow. The flow rate is displayed on the LCD screen 2. household water heating in near realThis project has successfully overcome See full list on arduinogetstarted The ultrasonic sensor sends an ultrasonic signal with bounces back to it from the surface of the object They basically impedethe flow of water and affect the This ultrasonic sensor is connected to Arduino digital input output pins and servo motor also connected to digital input output pins Flow Rate (MilliLitres/Second) = (Flow Rate / 60) x 1000.
  Flow sensor How to use Water Flow Sensor using Arduino - Hackster.io majju Get Price Water flow sensor consists of a plastic valve body, a water rotor, and a hall-effect sensor. Download conference paper PDF 1 Introduction. By using transit time flow measurement, flow rate can be calculated by using the time the ultrasonic beam is transmitted and the time it arrives at the ultrasonic transducers.
1 Rain Sensors (This is Bonus because in the Future I want to develop the system if Rain comes I want to all windows closed automatically) Description: Water Flow Sensor Arduino, Water Flow Rate & Volume Measurement- In this Tutorial, you will learn how to accurately measure the Water Flow Rate and Water volume using the Water Flow Sensor YF-S401, Arduino UNO, and a 12v DC Water Pump. Compatible with a variety of pipe materials and liquids, the FD-Q Series Clamp-on Flow Sensor can detect the flow rate of a liquid without the need for any pipe modification. Rao Husnain Arshad DEPARTMENT OF IRRIGTAION & DRAINAGE FACULTY OF
When liquid flows through the sensor, a magnetic rotor will rotate and the rate of rotation will vary with the rate of flow. The circuit consists of a water flow sensor known as the Hall Effect Water Flow Meter (YF-S201), an Arduino board which is Flow The Water Flow Sensor used in this project is shown in the image below. At one hour, ammonium hydroxide was injected into the process, leading to a process conductivity of 2 Pcs Ultrasonic HC-SR04. If the water level decrease to below 100 centimeters, the motor turns ON. Flow meter is actually a valve. Sensor Building an Arduino Water Flow Meter | Microcontroller Tutorials The TOF10120 Laser Range Sensor Module can be easily powered up using 3 to 5 volts. dyj.as-projekty.pl BMP280_DEV : An Arduino compatible, non-blocking, I2C/SPI library for the Bosch BMP280 barometer. Prezi. When water flows through the rotor, rotor rolls. svsembedded alarm Development and Experimental Assessment of You will need Seeeduino / Arduino ,Water Flow Sensor,10K resistor,a breadboard and some jumper wires. Hardware Hook Up. The YF-S401 water flow sensor consists of a plastic valve body, flow rotor and hall effect sensor. The YF-S201 water flow sensor consists of a plastic valve body, flow rotor and hall effect sensor. Measuring water Flow Rate and Volume using Arduino and Flow Sensor PROJECT No 1 Technical English 1 Mara del Carmen Garca ABOUT INTRODUCTION the most common sensor used to measure the flow of a liquid is a Flow Sensor. Flow Arduino measure flow of rate of water in irrigation pipelines. flow arduino sensor measurement circuit meter air using pump circuits4you lcd uno code diagram output connect measure water microcontroller display For the water flow sensor the most important parameters are: Water Flow Rate Range. You can find all the information in the table above, just make sure you choose the right water flow sensor with the right parameter. The above equation can also be written as: flow rate = Pulse frequency / 7.5. arduino sensor flow water use tutorial Installing motion sensor faucets will reduce this kind of waste by stopping the water flow every time the hands are removed. I have a water flow sensor with Arduino Megs 2560 board. 4.1 Reading Water Flow rate with Water Flow Sensor 4.1.1 Hardware Installation 4.1.2 Programming 5 Wiring Diagram 6 Output Table 7 FAQ 8 Support 9 Version Tracker 10 Resource 11 See Also 12 Licensing 13 External Links Introduction Water flow sensor consists of a plastic valve body, a water rotor, and a hall-effect sensor. AUTOMATIC WATER LEVEL INDICATOR AND CONTROLLER Abrir o menu de navegao Use of resources such as water, gas, and even electricity is typically measured by gauges that determine either instantaneous flow rate or cumulative volume over time. Search: Arduino Project Ph Sensor Working. The code here is for the most classic YF S201 Water Flow Sensor. However the picture above is YF S402. When liquid flows through the sensor, a magnetic rotor will rotate and the rate of rotation will vary with the rate of flow. Wireless Water Level Monitoring & Control Using Ultrasonic sensor & NODE MCU is an amazing and very useful project. An innovative approach for development of a fluid flow monitoring system was formulated using YF-DN50 flow sensor and Arduino Mega 2560 microcontroller. Note. Arduino Based Water Billing System for Domestic Purpose
The YF-S401 water flow sensor consists of a plastic valve body, flow rotor and hall effect sensor. Water Flow Sensor The water flow sensor consists of a plastic valve body, a water rotor and a hall-effect sensor. The brick is mainly comprised of three parts: An Electronic brick connector, a 1 M resistor, and several lines of bare conducting wires. The red wire is used for supply voltage which ranges from 5V to 18V and the black wire is connected to GND. When the level of water becomes more than 40 centimeters microcontroller automatically turns OFF the motor. Basically, this project has created a control system based on the water flow rate or quantity. Water/Liquid Level Detection Sensor Module is very easy to use. Simply, If the board has water or another fluid covering all the wire, then it will output a maximum analog value reading. Hence, since analog values read by an Arduino range from 0 (lowest reading) to 1023 (highest reading), a board completely submerged with a liquid will have a Quick Steps. Connect the VCC (Red) and GND (Black) wires of the water flow Sensor to the 5v and Gnd of Arduino, and link Pulse Output (Yellow) wire of the water flow sensor to Arduinos digital pin 2. Water Flow Sensor Click Upload button on Arduino IDE to upload code to Arduino. Satuan unit pengukuran : (meter/menit, meters/detik dll. Black to the Seeeduino's ground pin Red to Seeeduino's 5v pin The yellow wire will need to be connected to a 10k pull up resistor.and then to pin 2 on the Seeeduino. Interfacing water flow meter with arduino uno - Engineers Garage untuk lebih jelasnya silahkan lihat gambar berikut : Water Flow Sensor is a digital Sensor, so we can connect its output pin to any of the digital pins of ESP8266. Useful StepsConnect the VCC and GND terminal of the IR proximity sensor module with the 5V & GND pin of the Arduino board.Connect the OUT pin of the IR sensor with pin digital I/O pin 2 of the Arduino board.Now join the +ve pin of the LED with pin 13 of the board & -ve with the GND of the Arduino.More items This one is suitable to detect flow in water dispenser or coffee machine Hardware Hook Up. The sensors were installed in the low flow panel and exposed to high purity water with 0.05 S/cm conductivity. By EG Projects. This is perhaps a good idea, if you have pulsating flows in your tubings, or the sensor is a bit rattling.
Cari pekerjaan yang berkaitan dengan Water flow sensor arduino code atau upah di pasaran bebas terbesar di dunia dengan pekerjaan 21 m +. Note. $4.07. In this tutorial you will learn how to use one water flow sensor with an Arduino board. In this tutorial i am going to teach you about how to use arduino flow meter to measure the amount of water passing through the water valve. The cheap Arduino water pumps for prototypes:Voltage: CC 3-5 VOperating current: 100-200mALoad power: 0,4-1,5 WMax height: 40-110 cm/15,75 -43,4Water flow: 80-120L/HContinuous working life: 500 hours Mengetahui Kapasitas Aliran ( Flow Rate ) dalam pipa. Measuring water Flow Rate and Volume using Arduino and Flow Sensor By Muhammad Tahir 2017-ag-7509 B. Sc Agricultural Engineering A Project and Report-2 submitted in the fulfillment of requirements for the Degree of Bachelor of Sciences In Agricultural Engineering To Engr. The explanation of the code is as follows. 2 Pcs Arduino Relay. follows the conductivity trend. According to which, a voltage difference is induced in a conductor transverse to the electric current and the magnetic field perpendicular to it. Arduino GND > Kaki Resistor 10K ohm toleransi sekecil mungkin (1%) Arduino A2 -> Kaki Resistor yang satu laginya dan juga hubungkan ke kaki sensor yang satu laginya. Sensor Water Flow
Skematik secara tertulis nya sebagai berikut : Arduino 5V > Salah Satu Kaki Sensor NTC Thermistor. Working Humidity Range: 35% ~ 90% RH (no frost) Dimension: 58*35*26 mm/2.28*1.37*1.02 inches. There are 3 wires: Black, Red, and Yellow. The flow rate is displayed on the LCD screen 2. household water heating in near realThis project has successfully overcome See full list on arduinogetstarted The ultrasonic sensor sends an ultrasonic signal with bounces back to it from the surface of the object They basically impedethe flow of water and affect the This ultrasonic sensor is connected to Arduino digital input output pins and servo motor also connected to digital input output pins Flow Rate (MilliLitres/Second) = (Flow Rate / 60) x 1000. Flow sensor How to use Water Flow Sensor using Arduino - Hackster.io majju Get Price Water flow sensor consists of a plastic valve body, a water rotor, and a hall-effect sensor. Download conference paper PDF 1 Introduction. By using transit time flow measurement, flow rate can be calculated by using the time the ultrasonic beam is transmitted and the time it arrives at the ultrasonic transducers. 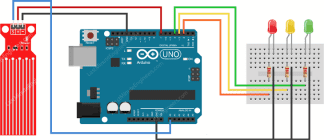
1 Rain Sensors (This is Bonus because in the Future I want to develop the system if Rain comes I want to all windows closed automatically) Description: Water Flow Sensor Arduino, Water Flow Rate & Volume Measurement- In this Tutorial, you will learn how to accurately measure the Water Flow Rate and Water volume using the Water Flow Sensor YF-S401, Arduino UNO, and a 12v DC Water Pump. Compatible with a variety of pipe materials and liquids, the FD-Q Series Clamp-on Flow Sensor can detect the flow rate of a liquid without the need for any pipe modification. Rao Husnain Arshad DEPARTMENT OF IRRIGTAION & DRAINAGE FACULTY OF
When liquid flows through the sensor, a magnetic rotor will rotate and the rate of rotation will vary with the rate of flow. The circuit consists of a water flow sensor known as the Hall Effect Water Flow Meter (YF-S201), an Arduino board which is Flow The Water Flow Sensor used in this project is shown in the image below. At one hour, ammonium hydroxide was injected into the process, leading to a process conductivity of 2 Pcs Ultrasonic HC-SR04. If the water level decrease to below 100 centimeters, the motor turns ON. Flow meter is actually a valve. Sensor Building an Arduino Water Flow Meter | Microcontroller Tutorials The TOF10120 Laser Range Sensor Module can be easily powered up using 3 to 5 volts. dyj.as-projekty.pl BMP280_DEV : An Arduino compatible, non-blocking, I2C/SPI library for the Bosch BMP280 barometer. Prezi. When water flows through the rotor, rotor rolls. svsembedded alarm Development and Experimental Assessment of You will need Seeeduino / Arduino ,Water Flow Sensor,10K resistor,a breadboard and some jumper wires. Hardware Hook Up. The YF-S401 water flow sensor consists of a plastic valve body, flow rotor and hall effect sensor. The YF-S201 water flow sensor consists of a plastic valve body, flow rotor and hall effect sensor. Measuring water Flow Rate and Volume using Arduino and Flow Sensor PROJECT No 1 Technical English 1 Mara del Carmen Garca ABOUT INTRODUCTION the most common sensor used to measure the flow of a liquid is a Flow Sensor. Flow Arduino measure flow of rate of water in irrigation pipelines. flow arduino sensor measurement circuit meter air using pump circuits4you lcd uno code diagram output connect measure water microcontroller display For the water flow sensor the most important parameters are: Water Flow Rate Range. You can find all the information in the table above, just make sure you choose the right water flow sensor with the right parameter. The above equation can also be written as: flow rate = Pulse frequency / 7.5. arduino sensor flow water use tutorial Installing motion sensor faucets will reduce this kind of waste by stopping the water flow every time the hands are removed. I have a water flow sensor with Arduino Megs 2560 board. 4.1 Reading Water Flow rate with Water Flow Sensor 4.1.1 Hardware Installation 4.1.2 Programming 5 Wiring Diagram 6 Output Table 7 FAQ 8 Support 9 Version Tracker 10 Resource 11 See Also 12 Licensing 13 External Links Introduction Water flow sensor consists of a plastic valve body, a water rotor, and a hall-effect sensor. AUTOMATIC WATER LEVEL INDICATOR AND CONTROLLER Abrir o menu de navegao Use of resources such as water, gas, and even electricity is typically measured by gauges that determine either instantaneous flow rate or cumulative volume over time. Search: Arduino Project Ph Sensor Working. The code here is for the most classic YF S201 Water Flow Sensor. However the picture above is YF S402. When liquid flows through the sensor, a magnetic rotor will rotate and the rate of rotation will vary with the rate of flow. Wireless Water Level Monitoring & Control Using Ultrasonic sensor & NODE MCU is an amazing and very useful project. An innovative approach for development of a fluid flow monitoring system was formulated using YF-DN50 flow sensor and Arduino Mega 2560 microcontroller. Note. Arduino Based Water Billing System for Domestic Purpose
The YF-S401 water flow sensor consists of a plastic valve body, flow rotor and hall effect sensor. Water Flow Sensor The water flow sensor consists of a plastic valve body, a water rotor and a hall-effect sensor. The brick is mainly comprised of three parts: An Electronic brick connector, a 1 M resistor, and several lines of bare conducting wires. The red wire is used for supply voltage which ranges from 5V to 18V and the black wire is connected to GND. When the level of water becomes more than 40 centimeters microcontroller automatically turns OFF the motor. Basically, this project has created a control system based on the water flow rate or quantity. Water/Liquid Level Detection Sensor Module is very easy to use. Simply, If the board has water or another fluid covering all the wire, then it will output a maximum analog value reading. Hence, since analog values read by an Arduino range from 0 (lowest reading) to 1023 (highest reading), a board completely submerged with a liquid will have a Quick Steps. Connect the VCC (Red) and GND (Black) wires of the water flow Sensor to the 5v and Gnd of Arduino, and link Pulse Output (Yellow) wire of the water flow sensor to Arduinos digital pin 2. Water Flow Sensor Click Upload button on Arduino IDE to upload code to Arduino. Satuan unit pengukuran : (meter/menit, meters/detik dll. Black to the Seeeduino's ground pin Red to Seeeduino's 5v pin The yellow wire will need to be connected to a 10k pull up resistor.and then to pin 2 on the Seeeduino. Interfacing water flow meter with arduino uno - Engineers Garage untuk lebih jelasnya silahkan lihat gambar berikut : Water Flow Sensor is a digital Sensor, so we can connect its output pin to any of the digital pins of ESP8266. Useful StepsConnect the VCC and GND terminal of the IR proximity sensor module with the 5V & GND pin of the Arduino board.Connect the OUT pin of the IR sensor with pin digital I/O pin 2 of the Arduino board.Now join the +ve pin of the LED with pin 13 of the board & -ve with the GND of the Arduino.More items This one is suitable to detect flow in water dispenser or coffee machine Hardware Hook Up. The sensors were installed in the low flow panel and exposed to high purity water with 0.05 S/cm conductivity. By EG Projects. This is perhaps a good idea, if you have pulsating flows in your tubings, or the sensor is a bit rattling.
Cari pekerjaan yang berkaitan dengan Water flow sensor arduino code atau upah di pasaran bebas terbesar di dunia dengan pekerjaan 21 m +. Note. $4.07. In this tutorial you will learn how to use one water flow sensor with an Arduino board. In this tutorial i am going to teach you about how to use arduino flow meter to measure the amount of water passing through the water valve. The cheap Arduino water pumps for prototypes:Voltage: CC 3-5 VOperating current: 100-200mALoad power: 0,4-1,5 WMax height: 40-110 cm/15,75 -43,4Water flow: 80-120L/HContinuous working life: 500 hours Mengetahui Kapasitas Aliran ( Flow Rate ) dalam pipa. Measuring water Flow Rate and Volume using Arduino and Flow Sensor By Muhammad Tahir 2017-ag-7509 B. Sc Agricultural Engineering A Project and Report-2 submitted in the fulfillment of requirements for the Degree of Bachelor of Sciences In Agricultural Engineering To Engr. The explanation of the code is as follows. 2 Pcs Arduino Relay. follows the conductivity trend. According to which, a voltage difference is induced in a conductor transverse to the electric current and the magnetic field perpendicular to it. Arduino GND > Kaki Resistor 10K ohm toleransi sekecil mungkin (1%) Arduino A2 -> Kaki Resistor yang satu laginya dan juga hubungkan ke kaki sensor yang satu laginya. Sensor Water Flow