Cricut Machines Comparison & Reviews Cool Crafts. To create bubble letters that won't be filled in, don't select "Writing.". I havent tried using a teflon sheet, but I would be worried that you wouldnt get enough heat from your EasyPress through the Teflon sheet, Im Sydney, the creator here at Tastefully Frugal. Include your email address to get a message when this question is answered. On the preview page, make sure you MIRROR your image! Want to remember this? My goal is to help you do more with the money you have. 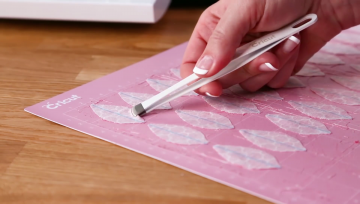 They were nice, crisp and clean. this setting is meant to be used for fabrics like denim or canvas. Im a mom to two crazy little boys and one little princess and married to the best guy around. If you are unsure of about this amazing tool, check out my reviewCricut Maker Review: 10 Reasons you'll love the Cricut Maker. That's about to change. I wanted to test a variety without spending all day cutting. I even cut a sweater with this setting.. and it was a WOW moment when I pulled the cut off the mat. Just seeing all the fabric types I was able to cut with this tool, I want to try to cut even more. Thanks to all authors for creating a page that has been read 27,926 times.
 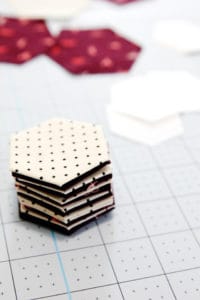 Here's what I learned. For example, you might create your text using a calligraphy pen and then another piece of text using a glitter pen to see which one works best. document.getElementById( "ak_js_1" ).setAttribute( "value", ( new Date() ).getTime() ); Thank you so much for sharing this information! How to Create Text in Cricut Design Space, How to Address Envelopes with a Cricut Calligraphy Pen. Im not going to lie, when I first heard about Cricut Infusible Ink I was super excited about the transfer sheets! I didnt really know a whole lot about the Infusible Ink pens and markers and wasnt as excited about them as I was the transfer sheets. From recipes to meal plans, crafts to organization tips and more! I really didn't think each fabric would cut as well as they did. Im a mom to two crazy little boys and one little princess and married to the best guy around. They arent just for hard surfaces, like coasters! I cannot wait to get one!! Our trained team of editors and researchers validate articles for accuracy and comprehensiveness. var ts=document.getElementById('ti-pixel-tracker'); var axel = Math.random() + ""; var num = axel * 1000000000000000000; var ti=document.createElement("img"); ti.style.display="none"; ti.src="https://tracking.tapinfluence.com/trk/jVtcj/HFac9/p.png?p=53dWR" + String.fromCharCode(38) + "i=IpYd8" + String.fromCharCode(38) + "ord="+ num + String.fromCharCode(38) + "s=" + encodeURIComponent(document.referrer); ts.parentNode.replaceChild(ti,ts); JSON.stringify({"program_id":"672abd60-70ef-11e9-af3a-0a4e3fc30406","post_id":"8e413e1c-983e-11e9-8390-0a9d66b43152"}); Im Sydney, the creator here at Tastefully Frugal. Some posts may contain affiliate links. What I don't talk about much is fabric. Browse my must have materials and supplies! Remove butcher paper and place your design face down on the onesie. One of my favorite features of the Cricut Maker is the amazing fabric cutting options. For this tutorial I am using Cricuts baby bodysuit. Like I mentioned above, you can use these pens and markers with ANY Cricut machine OR you can hand draw your designs too! My goal is to help you do more with the money you have. You can cut fabric using the Cricut Explore, but most fabrics require a stabilizer to cut cleanly. Infusible Ink Pens and Markers (it helps to use both since youll be coloring in some of the design). Make the text box bigger or smaller by dragging the lower right arrow on the text box in and out, depending on your preferences. Instead of butcher paper, is that Teflon paper used for iron-one acceptable? Your email address will not be published. Love It! I was hoping to get a picture of her in the onesie but shes a teeny tiny thing and the 0-3 month onesie is still too big for her (newborn onesies are a little big on her). So I test this too. To create this exact onesie, you can open this design in Design Space and skip the next 5 steps. {"smallUrl":"https:\/\/www.wikihow.com\/images\/thumb\/7\/78\/Write-with-a-Cricut-Maker-Step-1.jpg\/v4-460px-Write-with-a-Cricut-Maker-Step-1.jpg","bigUrl":"\/images\/thumb\/7\/78\/Write-with-a-Cricut-Maker-Step-1.jpg\/aid11500919-v4-728px-Write-with-a-Cricut-Maker-Step-1.jpg","smallWidth":460,"smallHeight":345,"bigWidth":728,"bigHeight":546,"licensing":"
License: Fair Use<\/a> (screenshot) License: Fair Use<\/a> (screenshot) License: Fair Use<\/a> (screenshot) License: Fair Use<\/a> (screenshot) License: Fair Use<\/a> (screenshot) License: Fair Use<\/a> (screenshot) License: Fair Use<\/a> (screenshot) License: Fair Use<\/a> (screenshot) License: Fair Use<\/a> (screenshot) License: Fair Use<\/a> (screenshot) License: Fair Use<\/a> (screenshot) License: Fair Use<\/a> (screenshot)
\n<\/p><\/div>"}, {"smallUrl":"https:\/\/www.wikihow.com\/images\/thumb\/a\/a8\/Write-with-a-Cricut-Maker-Step-2.jpg\/v4-460px-Write-with-a-Cricut-Maker-Step-2.jpg","bigUrl":"\/images\/thumb\/a\/a8\/Write-with-a-Cricut-Maker-Step-2.jpg\/aid11500919-v4-728px-Write-with-a-Cricut-Maker-Step-2.jpg","smallWidth":460,"smallHeight":345,"bigWidth":728,"bigHeight":546,"licensing":"
\n<\/p><\/div>"}, {"smallUrl":"https:\/\/www.wikihow.com\/images\/thumb\/d\/d1\/Write-with-a-Cricut-Maker-Step-3.jpg\/v4-460px-Write-with-a-Cricut-Maker-Step-3.jpg","bigUrl":"\/images\/thumb\/d\/d1\/Write-with-a-Cricut-Maker-Step-3.jpg\/aid11500919-v4-728px-Write-with-a-Cricut-Maker-Step-3.jpg","smallWidth":460,"smallHeight":345,"bigWidth":728,"bigHeight":546,"licensing":"
\n<\/p><\/div>"}, {"smallUrl":"https:\/\/www.wikihow.com\/images\/thumb\/b\/be\/Write-with-a-Cricut-Maker-Step-4.jpg\/v4-460px-Write-with-a-Cricut-Maker-Step-4.jpg","bigUrl":"\/images\/thumb\/b\/be\/Write-with-a-Cricut-Maker-Step-4.jpg\/aid11500919-v4-728px-Write-with-a-Cricut-Maker-Step-4.jpg","smallWidth":460,"smallHeight":345,"bigWidth":728,"bigHeight":546,"licensing":"
\n<\/p><\/div>"}, {"smallUrl":"https:\/\/www.wikihow.com\/images\/thumb\/c\/cf\/Write-with-a-Cricut-Maker-Step-5.jpg\/v4-460px-Write-with-a-Cricut-Maker-Step-5.jpg","bigUrl":"\/images\/thumb\/c\/cf\/Write-with-a-Cricut-Maker-Step-5.jpg\/aid11500919-v4-728px-Write-with-a-Cricut-Maker-Step-5.jpg","smallWidth":460,"smallHeight":345,"bigWidth":728,"bigHeight":546,"licensing":"
\n<\/p><\/div>"}, {"smallUrl":"https:\/\/www.wikihow.com\/images\/thumb\/0\/02\/Write-with-a-Cricut-Maker-Step-6.jpg\/v4-460px-Write-with-a-Cricut-Maker-Step-6.jpg","bigUrl":"\/images\/thumb\/0\/02\/Write-with-a-Cricut-Maker-Step-6.jpg\/aid11500919-v4-728px-Write-with-a-Cricut-Maker-Step-6.jpg","smallWidth":460,"smallHeight":345,"bigWidth":728,"bigHeight":546,"licensing":"
\n<\/p><\/div>"}, {"smallUrl":"https:\/\/www.wikihow.com\/images\/thumb\/a\/a1\/Write-with-a-Cricut-Maker-Step-7.jpg\/v4-460px-Write-with-a-Cricut-Maker-Step-7.jpg","bigUrl":"\/images\/thumb\/a\/a1\/Write-with-a-Cricut-Maker-Step-7.jpg\/aid11500919-v4-728px-Write-with-a-Cricut-Maker-Step-7.jpg","smallWidth":460,"smallHeight":345,"bigWidth":728,"bigHeight":546,"licensing":"
\n<\/p><\/div>"}, {"smallUrl":"https:\/\/www.wikihow.com\/images\/thumb\/d\/d0\/Write-with-a-Cricut-Maker-Step-8.jpg\/v4-460px-Write-with-a-Cricut-Maker-Step-8.jpg","bigUrl":"\/images\/thumb\/d\/d0\/Write-with-a-Cricut-Maker-Step-8.jpg\/aid11500919-v4-728px-Write-with-a-Cricut-Maker-Step-8.jpg","smallWidth":460,"smallHeight":345,"bigWidth":728,"bigHeight":546,"licensing":"
\n<\/p><\/div>"}, {"smallUrl":"https:\/\/www.wikihow.com\/images\/thumb\/6\/69\/Write-with-a-Cricut-Maker-Step-9.jpg\/v4-460px-Write-with-a-Cricut-Maker-Step-9.jpg","bigUrl":"\/images\/thumb\/6\/69\/Write-with-a-Cricut-Maker-Step-9.jpg\/aid11500919-v4-728px-Write-with-a-Cricut-Maker-Step-9.jpg","smallWidth":460,"smallHeight":345,"bigWidth":728,"bigHeight":546,"licensing":"
\n<\/p><\/div>"}, {"smallUrl":"https:\/\/www.wikihow.com\/images\/thumb\/6\/65\/Write-with-a-Cricut-Maker-Step-10.jpg\/v4-460px-Write-with-a-Cricut-Maker-Step-10.jpg","bigUrl":"\/images\/thumb\/6\/65\/Write-with-a-Cricut-Maker-Step-10.jpg\/aid11500919-v4-728px-Write-with-a-Cricut-Maker-Step-10.jpg","smallWidth":460,"smallHeight":345,"bigWidth":728,"bigHeight":546,"licensing":"
\n<\/p><\/div>"}, {"smallUrl":"https:\/\/www.wikihow.com\/images\/thumb\/8\/88\/Write-with-a-Cricut-Maker-Step-11.jpg\/v4-460px-Write-with-a-Cricut-Maker-Step-11.jpg","bigUrl":"\/images\/thumb\/8\/88\/Write-with-a-Cricut-Maker-Step-11.jpg\/aid11500919-v4-728px-Write-with-a-Cricut-Maker-Step-11.jpg","smallWidth":460,"smallHeight":345,"bigWidth":728,"bigHeight":546,"licensing":"
\n<\/p><\/div>"}, {"smallUrl":"https:\/\/www.wikihow.com\/images\/thumb\/5\/5b\/Write-with-a-Cricut-Maker-Step-12.jpg\/v4-460px-Write-with-a-Cricut-Maker-Step-12.jpg","bigUrl":"\/images\/thumb\/5\/5b\/Write-with-a-Cricut-Maker-Step-12.jpg\/aid11500919-v4-728px-Write-with-a-Cricut-Maker-Step-12.jpg","smallWidth":460,"smallHeight":345,"bigWidth":728,"bigHeight":546,"licensing":"
\n<\/p><\/div>"}, {"smallUrl":"https:\/\/www.wikihow.com\/images\/thumb\/b\/be\/Write-with-a-Cricut-Maker-Step-13.jpg\/v4-460px-Write-with-a-Cricut-Maker-Step-13.jpg","bigUrl":"\/images\/thumb\/b\/be\/Write-with-a-Cricut-Maker-Step-13.jpg\/aid11500919-v4-728px-Write-with-a-Cricut-Maker-Step-13.jpg","smallWidth":460,"smallHeight":345,"bigWidth":728,"bigHeight":546,"licensing":"