Snap the cover plate into position over the flange plate. A liner underlay will provide some insulation and protection against any abrasions between the liner and the floor and wall. 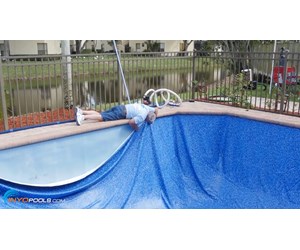 7. All swimming pools require a liner, whether theyre above-ground or in-ground. If you had a regular bead liner track installed but you want to switch to a j-hook liner, you can do this by removing the track. Dave Warren has been the president of Total Tech Pools & Leisure for more than 25 years, successfully developing the business into a one-stop pool shop. Total Tech Pools & Leisure is an award winning pool company serving the communities of Oakville, Burlington & Mississauga. If your pool is very large, it may take longer than 20 minutes to remove the air. If there are any creases from the floor seam to the top of the wall, turn the vacuum off and slide the liner along the linerlock to remove them. 2. If the cracks or tears are small and your pool liner is relatively new, you may be able to repair it with a patch without replacing the entire liner. Closely examine the interior of the pool.
 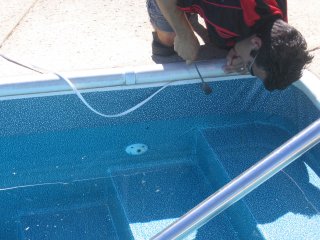 If the liner is cut too soon, stretching may occur, which will create creases around the fitting. 7. 3.
Youll likely need at least 1 or 2 people to help you lay the new liner in the pool. Include your email address to get a message when this question is answered. There are 24 references cited in this article, which can be found at the bottom of the page. This image is not<\/b> licensed under the Creative Commons license applied to text content and some other images posted to the wikiHow website. Locate the screw holes and pierce them with the bradawl. The outline of the plates will be easily visible through the liner. 10. 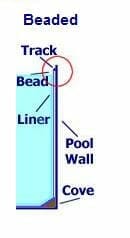 Although this might not seem like an important factor to some, the colour of the liner will have an impact on not only the overall appearance of the pool and its surrounding area, but it can impact its functionality as well. Take care to work on pairs of screws that are diagonally opposite one another, this allows the plates to be evenly screwed down. We love sharing great pool information and keeping our customers up to date on the latest events and happenings at Total Tech Pools. 2. 2. Get all the latest offers, sales, resources and tips. This image may not be used by other entities without the express written consent of wikiHow, Inc.
\n<\/p>
\n<\/p><\/div>"}, {"smallUrl":"https:\/\/www.wikihow.com\/images\/thumb\/5\/5b\/Replace-a-Pool-Liner-Step-3.jpg\/v4-460px-Replace-a-Pool-Liner-Step-3.jpg","bigUrl":"\/images\/thumb\/5\/5b\/Replace-a-Pool-Liner-Step-3.jpg\/aid11575030-v4-728px-Replace-a-Pool-Liner-Step-3.jpg","smallWidth":460,"smallHeight":345,"bigWidth":728,"bigHeight":546,"licensing":"
\u00a9 2022 wikiHow, Inc. All rights reserved. {"smallUrl":"https:\/\/www.wikihow.com\/images\/thumb\/a\/a9\/Replace-a-Pool-Liner-Step-1.jpg\/v4-460px-Replace-a-Pool-Liner-Step-1.jpg","bigUrl":"\/images\/thumb\/a\/a9\/Replace-a-Pool-Liner-Step-1.jpg\/aid11575030-v4-728px-Replace-a-Pool-Liner-Step-1.jpg","smallWidth":460,"smallHeight":345,"bigWidth":728,"bigHeight":546,"licensing":"
\u00a9 2022 wikiHow, Inc. All rights reserved. Make sure that you dont overfill the holes or fill the entire bottom, as this can impact the measurements youve taken of the pools depth. % of people told us that this article helped them.
Additionally, he is a founding member of WAPSA (World Alliance of pool and Spa Associations) formed in Cologne, Germany in 2017.  Here at 1st Direct Pools, we are always happy to help. 7. This image is not<\/b> licensed under the Creative Commons license applied to text content and some other images posted to the wikiHow website. This article was co-authored by wikiHow Staff. The first thing to consider when choosing the colour of your liner is that over time the colour will age. You can also use a siphon hose to remove the water from either an inground or above-ground pool. wikiHow, Inc. is the copyright holder of this image under U.S. and international copyright laws. wikiHow, Inc. is the copyright holder of this image under U.S. and international copyright laws. If you determine you need a new liner, you can purchase a new liner by assessing what type you need and measuring your pools length, width, and depth. Once secure, carefully cut out the liner that is held in the centre of the flange plates. Once the face plates are open, your pool is ready to use again. This image is not<\/b> licensed under the Creative Commons license applied to text content and some other images posted to the wikiHow website. 1. 5. Lighter coloured liners will enhance the clarity of the appearance of the water, but a darker colour liner will decrease the visibility of debris and absorb more heat from the sun. Over the winter, the weight of accumulated water and debris on your pools cover can pull the bead out of the track. Once the liner pull is done, a liner lock or retainer strip will be needed to temporarily hold the liner in the track. 5. 6. We specialize in pool repairs, restorations & maintenance including liner replacement, openings & closings, equipment installation, leak detection and new pool builds. wikiHow, Inc. is the copyright holder of this image under U.S. and international copyright laws. All Rights Reserved. Unroll and unfold the liner across the length of the pool. If you require any further assistance, be sure to contact a member of our team, or you can browse through our blog which is filled with loads of advice about maintaining your swimming pool and spa! A label signifying the position of the deep end will be attached to the liner. wikiHow, Inc. is the copyright holder of this image under U.S. and international copyright laws. If the liner is large and heavy, you can use a utility knife to cut it into smaller, more manageable pieces to remove it. 2. Then, you can remove the old liner and install the new liner so you can enjoy your clean, leak-free pool all summer long. This image may not be used by other entities without the express written consent of wikiHow, Inc.
\n<\/p>
\n<\/p><\/div>"}, {"smallUrl":"https:\/\/www.wikihow.com\/images\/thumb\/b\/b8\/Replace-a-Pool-Liner-Step-19.jpg\/v4-460px-Replace-a-Pool-Liner-Step-19.jpg","bigUrl":"\/images\/thumb\/b\/b8\/Replace-a-Pool-Liner-Step-19.jpg\/aid11575030-v4-728px-Replace-a-Pool-Liner-Step-19.jpg","smallWidth":460,"smallHeight":345,"bigWidth":728,"bigHeight":546,"licensing":"
\u00a9 2022 wikiHow, Inc. All rights reserved. This image may not be used by other entities without the express written consent of wikiHow, Inc.
\n<\/p>
\n<\/p><\/div>"}, {"smallUrl":"https:\/\/www.wikihow.com\/images\/thumb\/3\/3c\/Replace-a-Pool-Liner-Step-16.jpg\/v4-460px-Replace-a-Pool-Liner-Step-16.jpg","bigUrl":"\/images\/thumb\/3\/3c\/Replace-a-Pool-Liner-Step-16.jpg\/aid11575030-v4-728px-Replace-a-Pool-Liner-Step-16.jpg","smallWidth":460,"smallHeight":345,"bigWidth":728,"bigHeight":546,"licensing":"
\u00a9 2022 wikiHow, Inc. All rights reserved. wikiHow, Inc. is the copyright holder of this image under U.S. and international copyright laws. 4. 2. 7. This image may not be used by other entities without the express written consent of wikiHow, Inc.
\n<\/p>
\n<\/p><\/div>"}, {"smallUrl":"https:\/\/www.wikihow.com\/images\/thumb\/6\/68\/Replace-a-Pool-Liner-Step-14.jpg\/v4-460px-Replace-a-Pool-Liner-Step-14.jpg","bigUrl":"\/images\/thumb\/6\/68\/Replace-a-Pool-Liner-Step-14.jpg\/aid11575030-v4-728px-Replace-a-Pool-Liner-Step-14.jpg","smallWidth":460,"smallHeight":345,"bigWidth":728,"bigHeight":546,"licensing":"
\u00a9 2022 wikiHow, Inc. All rights reserved. wikiHow, Inc. is the copyright holder of this image under U.S. and international copyright laws. Contact us today to discuss your vision for your pool! This image is not<\/b> licensed under the Creative Commons license applied to text content and some other images posted to the wikiHow website.
References. This article explores how to install a vinyl pool liner in an in-ground pool. If you find extensive cracks or holes after you remove the liner, you may need to hire a professional to repair these before you can install the new liner. This image is not<\/b> licensed under the Creative Commons license applied to text content and some other images posted to the wikiHow website. JavaScript seems to be disabled in your browser. This image is not<\/b> licensed under the Creative Commons license applied to text content and some other images posted to the wikiHow website. wikiHow, Inc. is the copyright holder of this image under U.S. and international copyright laws. This image may not be used by other entities without the express written consent of wikiHow, Inc.
\n<\/p>
\n<\/p><\/div>"}, {"smallUrl":"https:\/\/www.wikihow.com\/images\/thumb\/7\/7e\/Replace-a-Pool-Liner-Step-12.jpg\/v4-460px-Replace-a-Pool-Liner-Step-12.jpg","bigUrl":"\/images\/thumb\/7\/7e\/Replace-a-Pool-Liner-Step-12.jpg\/aid11575030-v4-728px-Replace-a-Pool-Liner-Step-12.jpg","smallWidth":460,"smallHeight":345,"bigWidth":728,"bigHeight":546,"licensing":"
\u00a9 2022 wikiHow, Inc. All rights reserved. This image is not<\/b> licensed under the Creative Commons license applied to text content and some other images posted to the wikiHow website. This image is not<\/b> licensed under the Creative Commons license applied to text content and some other images posted to the wikiHow website. We pride ourselves on providing honest & fair service with a very strong emphasis on education & training. 4. This image may not be used by other entities without the express written consent of wikiHow, Inc.
\n<\/p>
\n<\/p><\/div>"}, {"smallUrl":"https:\/\/www.wikihow.com\/images\/thumb\/8\/86\/Replace-a-Pool-Liner-Step-17.jpg\/v4-460px-Replace-a-Pool-Liner-Step-17.jpg","bigUrl":"\/images\/thumb\/8\/86\/Replace-a-Pool-Liner-Step-17.jpg\/aid11575030-v4-728px-Replace-a-Pool-Liner-Step-17.jpg","smallWidth":460,"smallHeight":345,"bigWidth":728,"bigHeight":546,"licensing":"
\u00a9 2022 wikiHow, Inc. All rights reserved. In some cases too much of the liner is out of its track, which would require emptying the pool and reseating the liner. This image is not<\/b> licensed under the Creative Commons license applied to text content and some other images posted to the wikiHow website. In some cases, youll need to use scissors to cut off the j-hook or beading at the top, depending on how the unibead liner is designed. Align the flange plate with the gasket and tighten the screws. They are also relied on to improve the appearance of the pool. Measure the pool liner to ensure that it is of the correct specifications to your pool. Last Updated: December 14, 2019 All Rights Reserved. Is It Time for a Pull? If you are replacing an old swimming pool liner, naturally, you will need to remove the old liner first. Screw the eyeball housing assembly into position. Cut the liner into sections, this will help to ease the removal process. If youre planning on installing the liner yourself you can save a tonne of money, but do bear in mind that hiring a professional can ensure its longevity. Reg no 06715377. The edge of the liner is fitted with beads and slides along rails that are positioned along the poolside, under the edging or coping - an area that separates the pools shell from the surrounding surface area. Remove anything that might damage the liner, such as stones, gravel and protruding pieces of cement. Use caution when choosing the tape; colour may affect the liner over time so it is important to only use specialised tape. This image may not be used by other entities without the express written consent of wikiHow, Inc.
\n<\/p>
\n<\/p><\/div>"}, {"smallUrl":"https:\/\/www.wikihow.com\/images\/thumb\/1\/16\/Replace-a-Pool-Liner-Step-11.jpg\/v4-460px-Replace-a-Pool-Liner-Step-11.jpg","bigUrl":"\/images\/thumb\/1\/16\/Replace-a-Pool-Liner-Step-11.jpg\/aid11575030-v4-728px-Replace-a-Pool-Liner-Step-11.jpg","smallWidth":460,"smallHeight":345,"bigWidth":728,"bigHeight":546,"licensing":"
\u00a9 2022 wikiHow, Inc. All rights reserved. Once secure, carefully cut out the inner circle of the liner. 3. This image is not<\/b> licensed under the Creative Commons license applied to text content and some other images posted to the wikiHow website. For commissioning purposes, top up the pool by an extra 1 of water. You can hire these from a local hire shop. 3.
Ensure that you continue to work in diagonally opposite pairs to evenly secure the fitting. The instructions listed below are tailored for the installation of an inground vinyl pool liner using the hung attachment method. This image may not be used by other entities without the express written consent of wikiHow, Inc.
\n<\/p>
\n<\/p><\/div>"}, {"smallUrl":"https:\/\/www.wikihow.com\/images\/thumb\/0\/0e\/Replace-a-Pool-Liner-Step-22.jpg\/v4-460px-Replace-a-Pool-Liner-Step-22.jpg","bigUrl":"\/images\/thumb\/0\/0e\/Replace-a-Pool-Liner-Step-22.jpg\/aid11575030-v4-728px-Replace-a-Pool-Liner-Step-22.jpg","smallWidth":460,"smallHeight":345,"bigWidth":728,"bigHeight":546,"licensing":"
\u00a9 2022 wikiHow, Inc. All rights reserved. Use masking tape to seal the open ends of the pipes connected to the skimmers, inlets, main drain and vac point. Thanks to all authors for creating a page that has been read 2,365 times. Once secure, carefully cut out the inner rectangle of the liner. The liner will be hot). This image may not be used by other entities without the express written consent of wikiHow, Inc.
\n<\/p>
\n<\/p><\/div>"}, {"smallUrl":"https:\/\/www.wikihow.com\/images\/thumb\/b\/b8\/Replace-a-Pool-Liner-Step-18.jpg\/v4-460px-Replace-a-Pool-Liner-Step-18.jpg","bigUrl":"\/images\/thumb\/b\/b8\/Replace-a-Pool-Liner-Step-18.jpg\/aid11575030-v4-728px-Replace-a-Pool-Liner-Step-18.jpg","smallWidth":460,"smallHeight":345,"bigWidth":728,"bigHeight":546,"licensing":"
\u00a9 2022 wikiHow, Inc. All rights reserved. If installing an underlay, cut the underlay to the size and shape required, using something similar to a Stanley knife. Align the flange plate with the gasket and tighten the screws. Again, taking this approach will depend on the age of the liner. The overlap method is where you fold the liner down over the edges of the pool and clip around the rod over the liner to keep it in place. Pool openings or temperature fluctuations can expose those hidden weak spots, necessitating a liner pull. wikiHow, Inc. is the copyright holder of this image under U.S. and international copyright laws. a liner block). Hung is the most common attachment method used for inground pools. The liner will have special beading welding along the top edge - this will clip into the aperture of the linerlock, which is already fixed to the top of the pool. These thicknesses are usually expressed in 100ths of a millimetre - for example, 45/100 is equivalent to 0.45 mm, or 150/100 is equivalent to 1.5mm. My Pool Liners Come Off Track. 6. Firstly, you will want to ensure that anyone who is assisting you to fit the liner will only enter the pool barefoot to avoid any punctures. You can cut the liner into 2-4 pieces and 6 below the bead track to first remove the bulk of the liner, and then you can return to remove the remaining liner. First, you might need to pump water out from behind the liner. The most effective way to position and secure the liner is to use an industrial wet and dry vacuum. 1. Installing a liner can be confusing. This image is not<\/b> licensed under the Creative Commons license applied to text content and some other images posted to the wikiHow website. 6. Before you begin cutting out the return inlet fitting, the water level must be immediately below the fitting. 3. Privacy PolicyTerms of Use. To assess the damage and ensure a quality liner service or installation, work with a reputable pool service provider to guarantee reliable workmanship. wikiHow, Inc. is the copyright holder of this image under U.S. and international copyright laws. Dark blue liners will also increase the appearance of depth in the pool. This image is not<\/b> licensed under the Creative Commons license applied to text content and some other images posted to the wikiHow website. This image may not be used by other entities without the express written consent of wikiHow, Inc.
\n<\/p>
\n<\/p><\/div>"}, {"smallUrl":"https:\/\/www.wikihow.com\/images\/thumb\/d\/d5\/Replace-a-Pool-Liner-Step-8.jpg\/v4-460px-Replace-a-Pool-Liner-Step-8.jpg","bigUrl":"\/images\/thumb\/d\/d5\/Replace-a-Pool-Liner-Step-8.jpg\/aid11575030-v4-728px-Replace-a-Pool-Liner-Step-8.jpg","smallWidth":460,"smallHeight":345,"bigWidth":728,"bigHeight":546,"licensing":"
\u00a9 2022 wikiHow, Inc. All rights reserved. 5. This image may not be used by other entities without the express written consent of wikiHow, Inc.
\n<\/p>
\n<\/p><\/div>"}, {"smallUrl":"https:\/\/www.wikihow.com\/images\/thumb\/2\/26\/Replace-a-Pool-Liner-Step-4.jpg\/v4-460px-Replace-a-Pool-Liner-Step-4.jpg","bigUrl":"\/images\/thumb\/2\/26\/Replace-a-Pool-Liner-Step-4.jpg\/aid11575030-v4-728px-Replace-a-Pool-Liner-Step-4.jpg","smallWidth":460,"smallHeight":345,"bigWidth":728,"bigHeight":546,"licensing":"
\u00a9 2022 wikiHow, Inc. All rights reserved. 3. This image is not<\/b> licensed under the Creative Commons license applied to text content and some other images posted to the wikiHow website. 1. Contact us today to discuss your vision for your pool! 5. This image may not be used by other entities without the express written consent of wikiHow, Inc.
\n<\/p>
\n<\/p><\/div>"}, {"smallUrl":"https:\/\/www.wikihow.com\/images\/thumb\/7\/72\/Replace-a-Pool-Liner-Step-2.jpg\/v4-460px-Replace-a-Pool-Liner-Step-2.jpg","bigUrl":"\/images\/thumb\/7\/72\/Replace-a-Pool-Liner-Step-2.jpg\/aid11575030-v4-728px-Replace-a-Pool-Liner-Step-2.jpg","smallWidth":460,"smallHeight":345,"bigWidth":728,"bigHeight":546,"licensing":"
\u00a9 2022 wikiHow, Inc. All rights reserved. 10. A regular or standard bead liner has a simple bead pattern around the top that snaps into the track. 1. This image is not<\/b> licensed under the Creative Commons license applied to text content and some other images posted to the wikiHow website. 2. This image may not be used by other entities without the express written consent of wikiHow, Inc.
\n<\/p>
\n<\/p><\/div>"}, {"smallUrl":"https:\/\/www.wikihow.com\/images\/thumb\/1\/13\/Replace-a-Pool-Liner-Step-9.jpg\/v4-460px-Replace-a-Pool-Liner-Step-9.jpg","bigUrl":"\/images\/thumb\/1\/13\/Replace-a-Pool-Liner-Step-9.jpg\/aid11575030-v4-728px-Replace-a-Pool-Liner-Step-9.jpg","smallWidth":460,"smallHeight":345,"bigWidth":728,"bigHeight":546,"licensing":"
\u00a9 2022 wikiHow, Inc. All rights reserved. Butt the joints together so they do not overlap and tape the seams with specialised liner underlay tape. wikiHow, Inc. is the copyright holder of this image under U.S. and international copyright laws. 2. Vinyl inground pools are generally less expensive than fiberglass, tile, or concrete. While overlap liners are generally the easiest to install, they do tend to slip into the water more easily than other types of above-ground liners. This image is not<\/b> licensed under the Creative Commons license applied to text content and some other images posted to the wikiHow website. Ensure that the central plumbing of the swimming pool is turned off. - A Phillips screwdriver- Stanley knife- Bradawl- The main drain flange plates- Gaskets- Grilles- Screws. Puncture each of the screw holes in the main drain faceplates with a bradawl. wikiHow, Inc. is the copyright holder of this image under U.S. and international copyright laws. wikiHow, Inc. is the copyright holder of this image under U.S. and international copyright laws. Unibed is similar to the Hung method but can also be used for above-ground pools. Its common for new liners to appear in the track during installation when in fact they are not. wikiHow, Inc. is the copyright holder of this image under U.S. and international copyright laws. This image is not<\/b> licensed under the Creative Commons license applied to text content and some other images posted to the wikiHow website. This image is not<\/b> licensed under the Creative Commons license applied to text content and some other images posted to the wikiHow website. Small above-ground pools are recommended to use 50/100 liners. This image may not be used by other entities without the express written consent of wikiHow, Inc.
\n<\/p>
\n<\/p><\/div>"}, {"smallUrl":"https:\/\/www.wikihow.com\/images\/thumb\/c\/cc\/Replace-a-Pool-Liner-Step-13.jpg\/v4-460px-Replace-a-Pool-Liner-Step-13.jpg","bigUrl":"\/images\/thumb\/c\/cc\/Replace-a-Pool-Liner-Step-13.jpg\/aid11575030-v4-728px-Replace-a-Pool-Liner-Step-13.jpg","smallWidth":460,"smallHeight":345,"bigWidth":728,"bigHeight":546,"licensing":"
\u00a9 2022 wikiHow, Inc. All rights reserved. He also serves on the Retail Council for APSP and is Chairman of the Retail Education Task Force. This image may not be used by other entities without the express written consent of wikiHow, Inc.
\n<\/p>
\n<\/p><\/div>"}, {"smallUrl":"https:\/\/www.wikihow.com\/images\/thumb\/1\/17\/Replace-a-Pool-Liner-Step-7.jpg\/v4-460px-Replace-a-Pool-Liner-Step-7.jpg","bigUrl":"\/images\/thumb\/1\/17\/Replace-a-Pool-Liner-Step-7.jpg\/aid11575030-v4-728px-Replace-a-Pool-Liner-Step-7.jpg","smallWidth":460,"smallHeight":345,"bigWidth":728,"bigHeight":546,"licensing":"
\u00a9 2022 wikiHow, Inc. All rights reserved. A swimming pool liner is a surface attached to the walls and floor of the pool. He is a Past President and currently serves as Secretary of the Pool and Hot Tub Council of Canada. Fading can, however, be a sign that the pool liner is reaching the end of its usable years. wikiHow, Inc. is the copyright holder of this image under U.S. and international copyright laws. This image may not be used by other entities without the express written consent of wikiHow, Inc.
\n<\/p>
\n<\/p><\/div>"}, {"smallUrl":"https:\/\/www.wikihow.com\/images\/thumb\/c\/c1\/Replace-a-Pool-Liner-Step-25.jpg\/v4-460px-Replace-a-Pool-Liner-Step-25.jpg","bigUrl":"\/images\/thumb\/c\/c1\/Replace-a-Pool-Liner-Step-25.jpg\/aid11575030-v4-728px-Replace-a-Pool-Liner-Step-25.jpg","smallWidth":460,"smallHeight":345,"bigWidth":728,"bigHeight":546,"licensing":"
\u00a9 2022 wikiHow, Inc. All rights reserved. wikiHow, Inc. is the copyright holder of this image under U.S. and international copyright laws. 8. Seal the gap surrounding the swimming pool hose with either tape or wet towels and turn the vacuum cleaner on. by Dave Warren | Apr 20, 2016 | Pool Liners. For a round pool, measure the diameter of the pool across the center of the inside of the pool wall. Youll need to perform a service call to remove water before attempting a liner pull. This system is best for imprecise pool measurements as an oversized liners excess can easily be cut down. While maintaining the pressure, lift the wall of the liner and feed the beading into the top of the linerlock, until it is held into position. Leave about 5 inches (13cm) of the liner loose so that you can fit you shop vac hose inside the liner to seal it to the pool shell. The way in which youll remove the track varies greatly depending on the type of track, however, so many sure you consult your manual or ask for professional advice. While its unlikely, it is possible for inground, beaded, and unibead liners to pop out of the track as you fill the pool, so keep an eye on the track on these types of liners as well. Liner thicknesses can range from 0.45-1.5mm. Switch off the vacuum cleaner when the pool has been filled to a level of 150mm (6) above the shallow end floor. wikiHow, Inc. is the copyright holder of this image under U.S. and international copyright laws.
1. Once you are completely satisfied with the liner, fill the deep end base of the pool with 75mm (3) of water. This image may not be used by other entities without the express written consent of wikiHow, Inc.
\n<\/p>
\n<\/p><\/div>"}, {"smallUrl":"https:\/\/www.wikihow.com\/images\/thumb\/a\/a4\/Replace-a-Pool-Liner-Step-10.jpg\/v4-460px-Replace-a-Pool-Liner-Step-10.jpg","bigUrl":"\/images\/thumb\/a\/a4\/Replace-a-Pool-Liner-Step-10.jpg\/aid11575030-v4-728px-Replace-a-Pool-Liner-Step-10.jpg","smallWidth":460,"smallHeight":345,"bigWidth":728,"bigHeight":546,"licensing":"
\u00a9 2022 wikiHow, Inc. All rights reserved.